Anatomia
Máquina
Vista lateral, agulha e calcador, painel de controle. Diagramas extraídos das páginas B-3, B-4 e B-5 do manual.
Vista lateral/traseira
Página B-3 →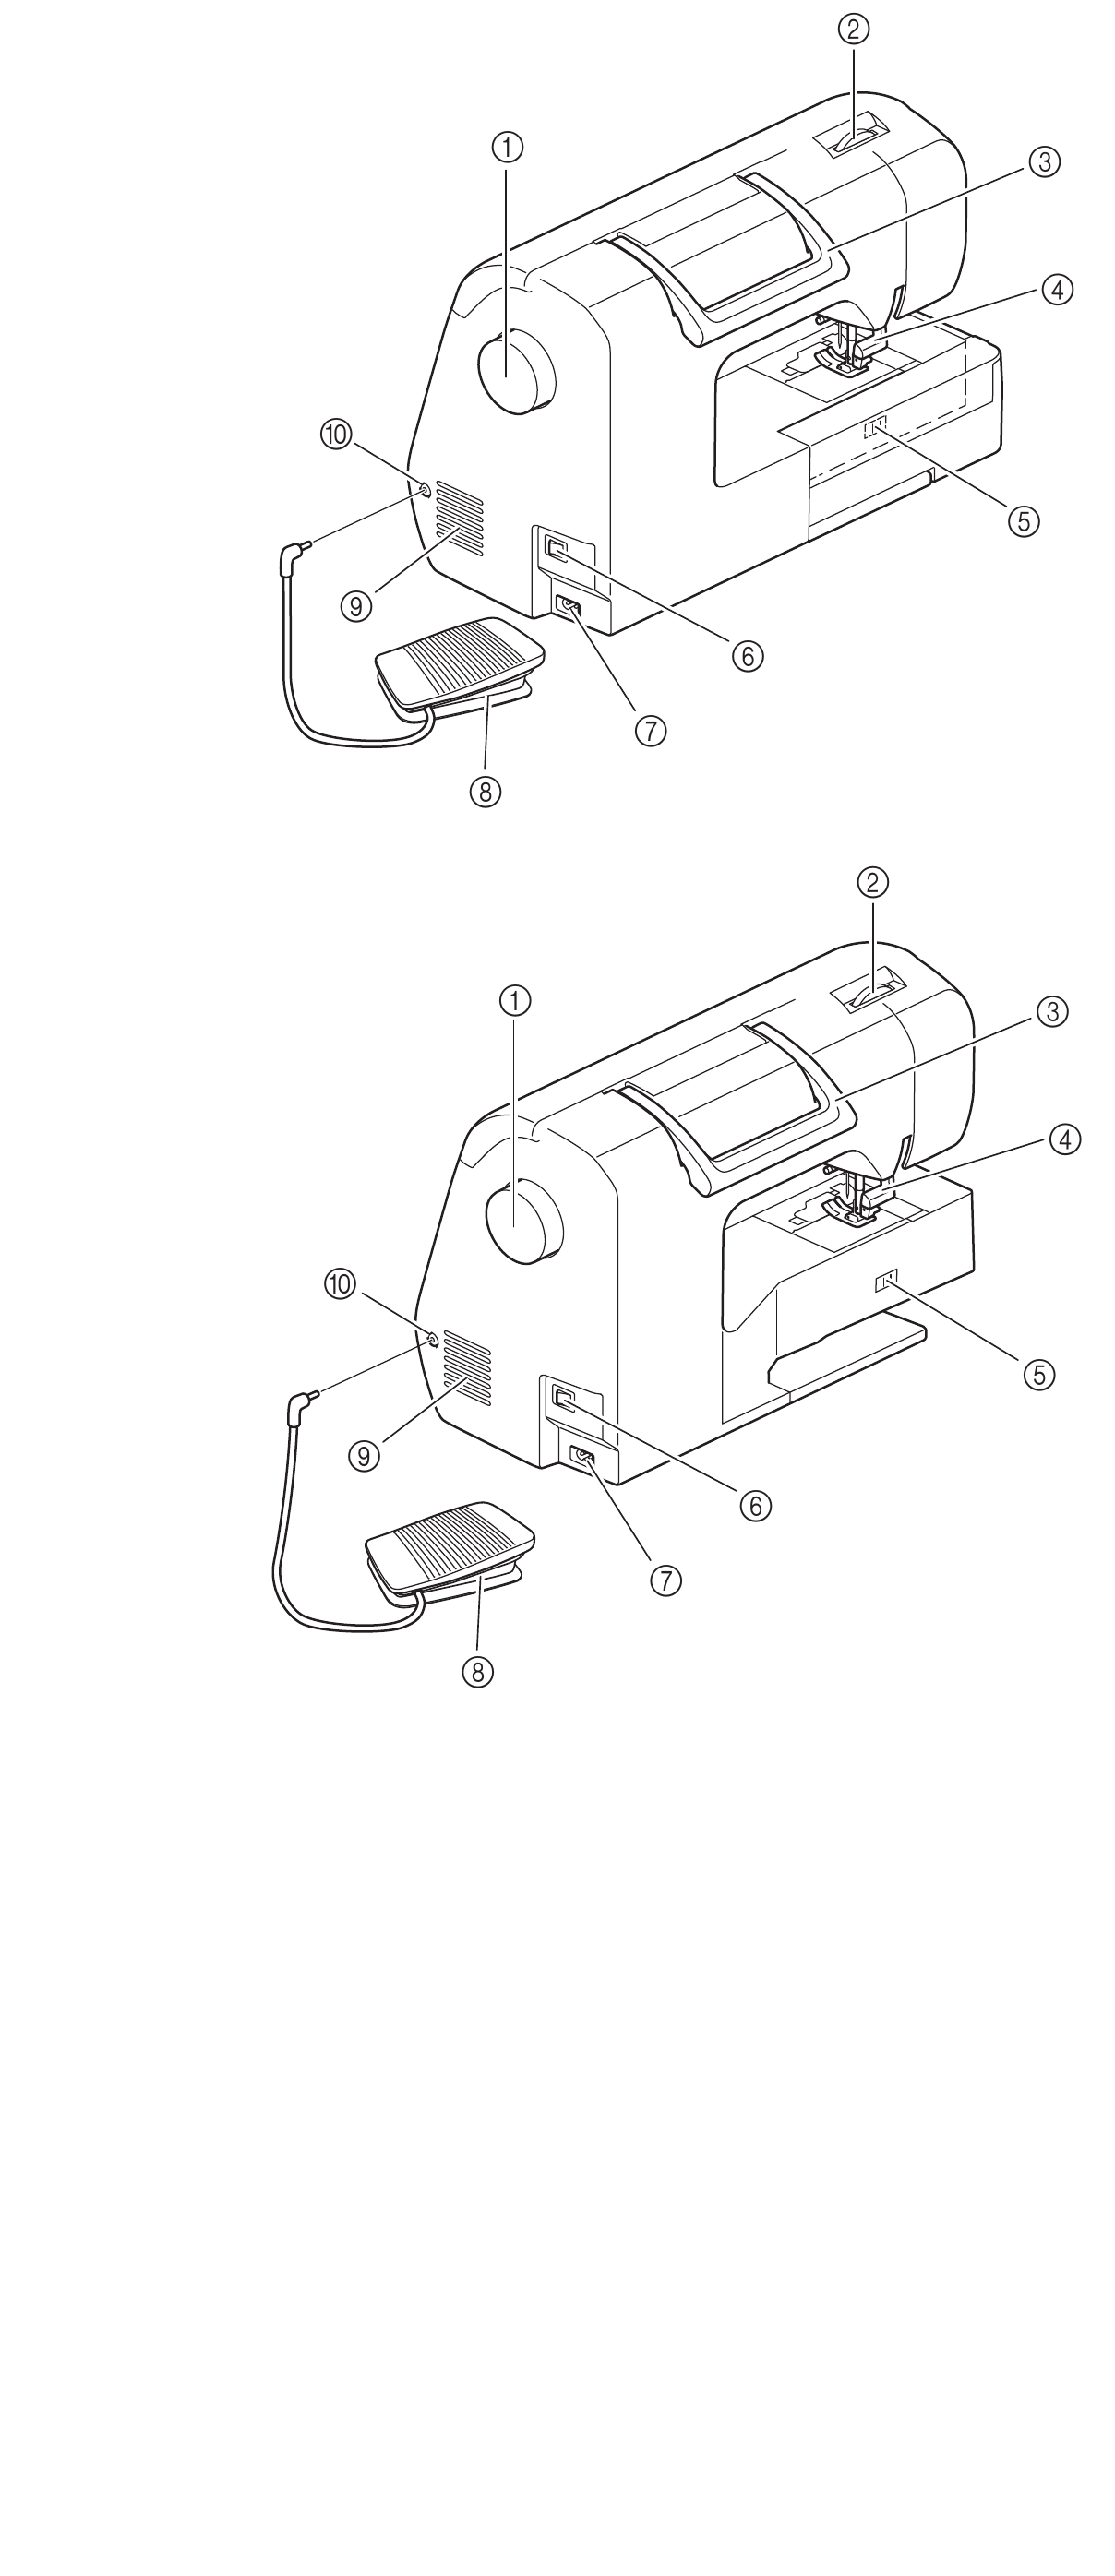
Names of Machine Parts and Their Functions
GETTING
READY
■ Right-side/rear view 1 Handwheel
Turn the handwheel toward you (counterclockwise) to raise and
The appearance of the machine differs depending on the
lower the needle to sew one stitch.
model.
2 Presser foot pressure dial
Adjust the amount of pressure that the presser foot applies to B
the fabric.
b
3 Handle
Carry the machine by its handle when transporting.
4 Presser foot lever
a Raise and lower the presser foot lever to raise and lower the
c
presser foot.
5 Feed dog position switch
Use the feed dog position switch to raise and lower the feed
d dogs. (pageS-31)
6 Main power switch
Use the main power switch to turn the machine on and off.
7 Power supply jack
j Insert the plug on the power supply cord into the power supply
jack.
8 Foot controller
e
Depress the foot controller to control the speed of the machine.
(pageB-34)
i 9 Air vent
f The air vent allows the air surrounding the motor to circulate.
Do not cover the air vent while the machine is being used.
g 0 Foot controller jack
Insert the plug on the end of the foot controller cable into the
h
foot controller jack.
b
a
c
d
j
e
i
f
g
h
Basic operations B-3
Agulha e calcador / botões de operação
Página B-4 →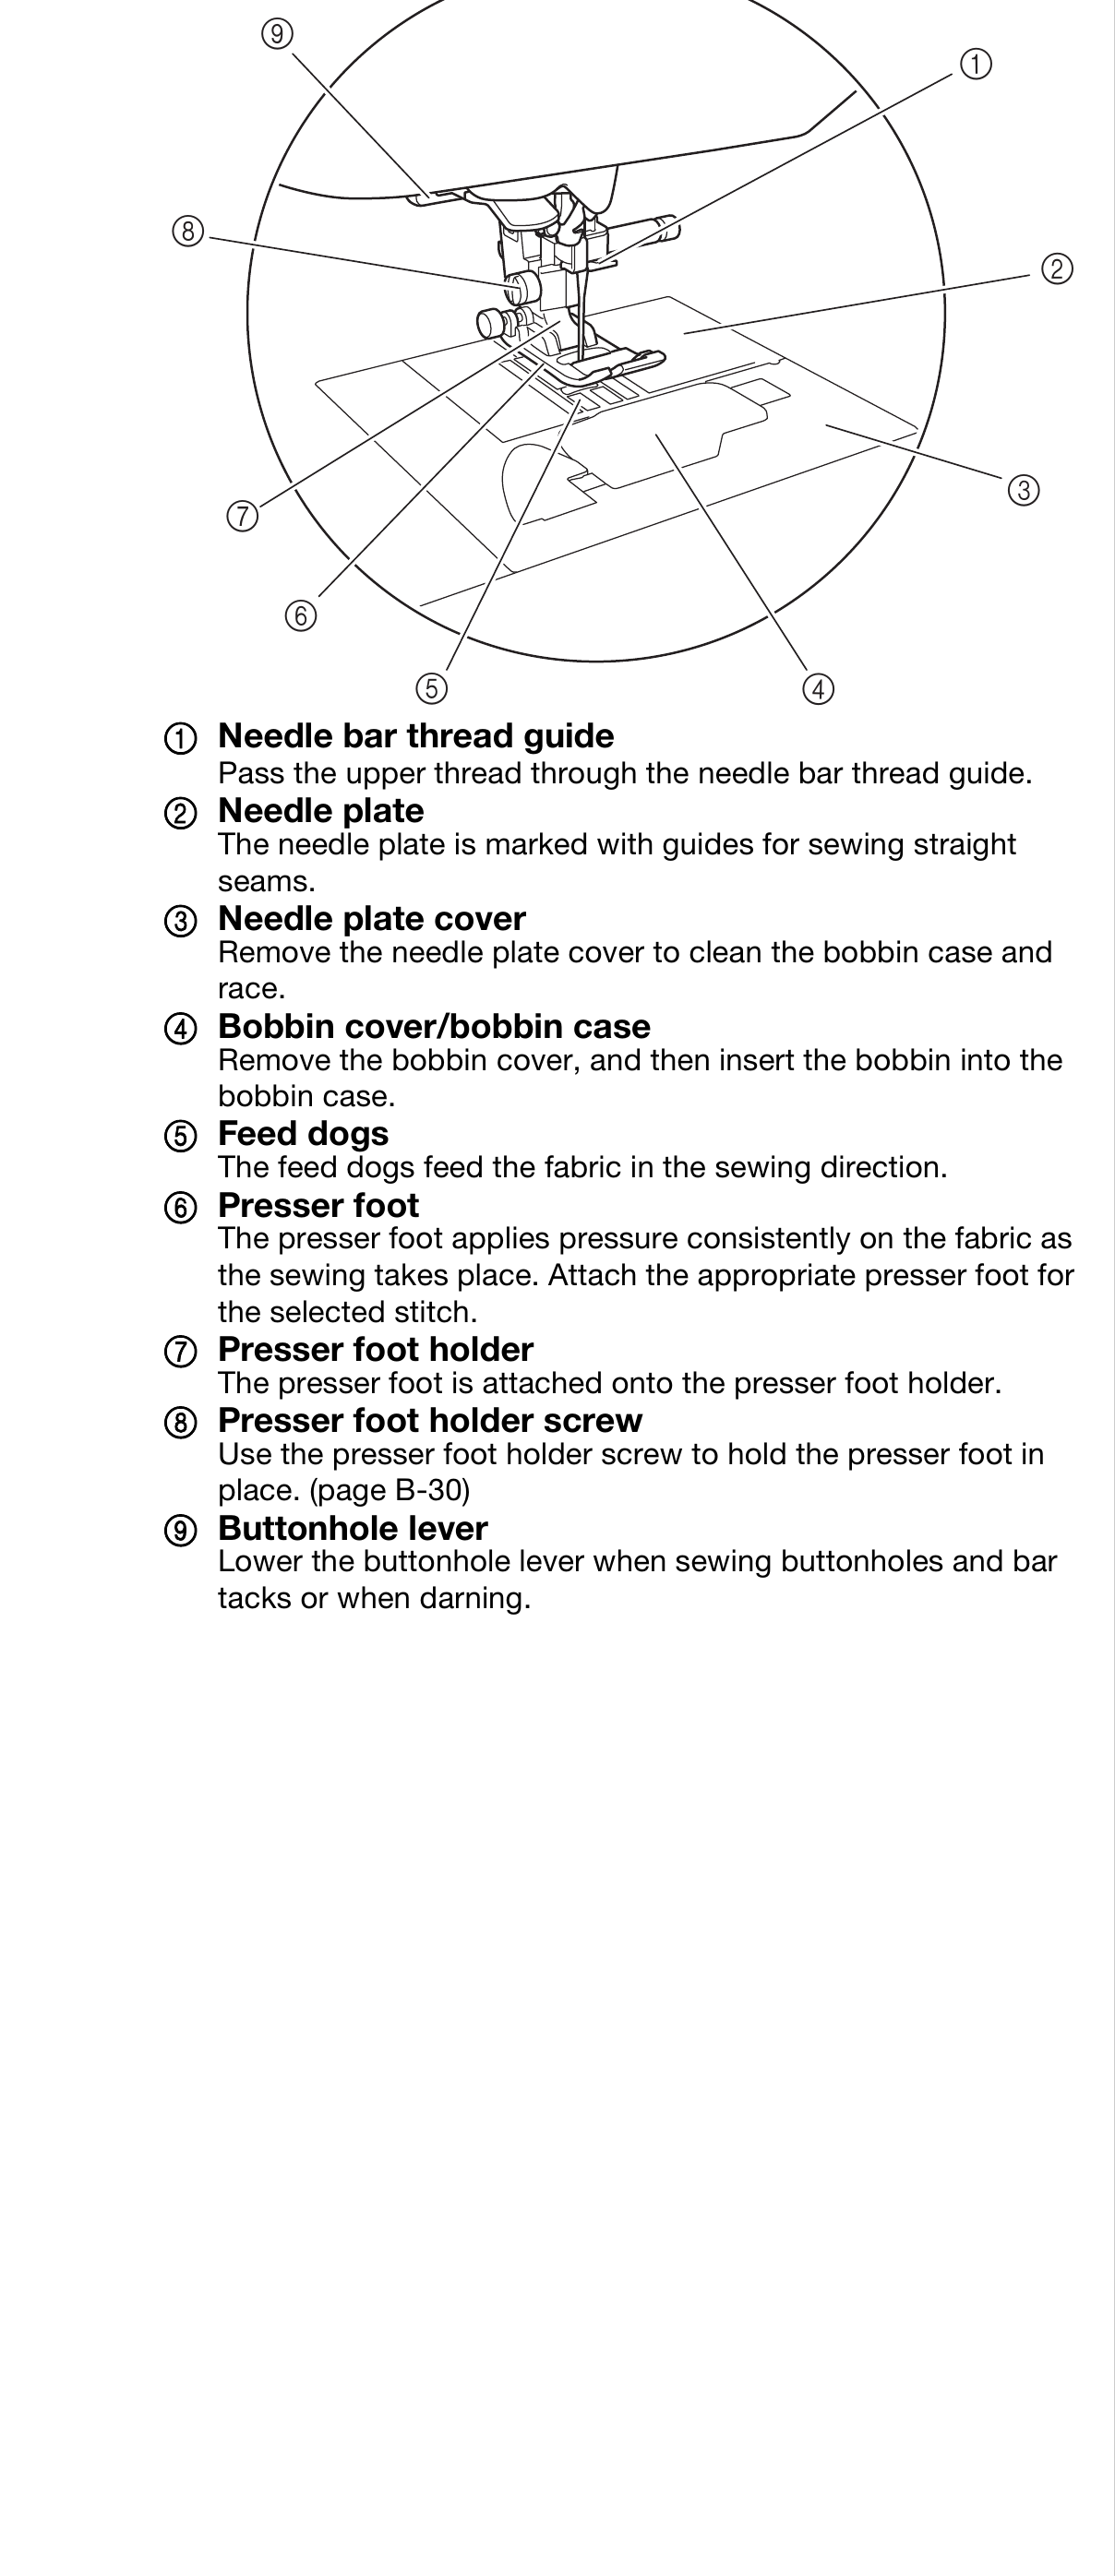
Names of Machine Parts and Their Functions
Needle and presser foot section Operation buttons
b c d e
i
a
a f
h
b
1 “Start/Stop” button
Press the “Start/Stop” button to start or stop sewing. The
c
g machine stitches at a slow speed at the beginning of sewing
while the button is pressed. When sewing is stopped, the
needle is lowered in the fabric. For details, refer to “STARTING
f TO SEW” on pageB-31.
The button changes color according to the machine’s
e d operation mode.
1 Needle bar thread guide Green: The machine is ready to sew or is sewing.
Pass the upper thread through the needle bar thread guide. Red: The machine can not sew.
2 Needle plate
Orange: The machine is winding the bobbin thread, or
The needle plate is marked with guides for sewing straight
the bobbin winder shaft is moved to the right
seams.
3 Needle plate cover side.
Remove the needle plate cover to clean the bobbin case and 2 Reverse stitch button
race. For straight, zigzag, and elastic zigzag stitch patterns that use
4 Bobbin cover/bobbin case reverse stitches, the machine will sew reverse stitches at low
Remove the bobbin cover, and then insert the bobbin into the speed only while holding down the Reverse stitch button. The
bobbin case. stitches are sewn in the opposite position.
5 Feed dogs For other stitches, use this button to sew reinforcement
The feed dogs feed the fabric in the sewing direction. stitches at the beginning and end of sewing. Press and hold
6 Presser foot
this button, and the machine sews 3 stitches in the same spot
The presser foot applies pressure consistently on the fabric as
and stops automatically. (pageB-35)
the sewing takes place. Attach the appropriate presser foot for
the selected stitch. 3 Reinforcement stitch button
7 Presser foot holder Use this button to sew a single stitch repeatedly and tie-off.
The presser foot is attached onto the presser foot holder. For character/decorative stitches, press this button to end with
8 Presser foot holder screw a full stitch instead of at a mid-point. The LED light beside this
Use the presser foot holder screw to hold the presser foot in button lights up while the machine is sewing a full motif, and
place. (pageB-30) automatically turns off when the sewing is stopped. (pageB-
9 Buttonhole lever 35)
Lower the buttonhole lever when sewing buttonholes and bar 4 Needle position button
tacks or when darning. Press the needle position button to raise or lower the needle.
Pressing the button twice sews one stitch.
5 Thread cutter button
(Equipped on some models.)
Press the thread cutter button after sewing is stopped to cut
both the upper and the bobbin threads. For details, refer to
step under “Sewing a stitch” on pageB-34.
j
6 Sewing speed controller
Slide the sewing speed controller to adjust the sewing speed.
CAUTION
• (Only on models with (Thread cutter
button))
Do not press (Thread cutter button) after
the threads have already been cut, otherwise
the needle may break, the threads may
become tangled or damage to the machine
may occur.
B-4
Painel de controle e teclas
Página B-5 →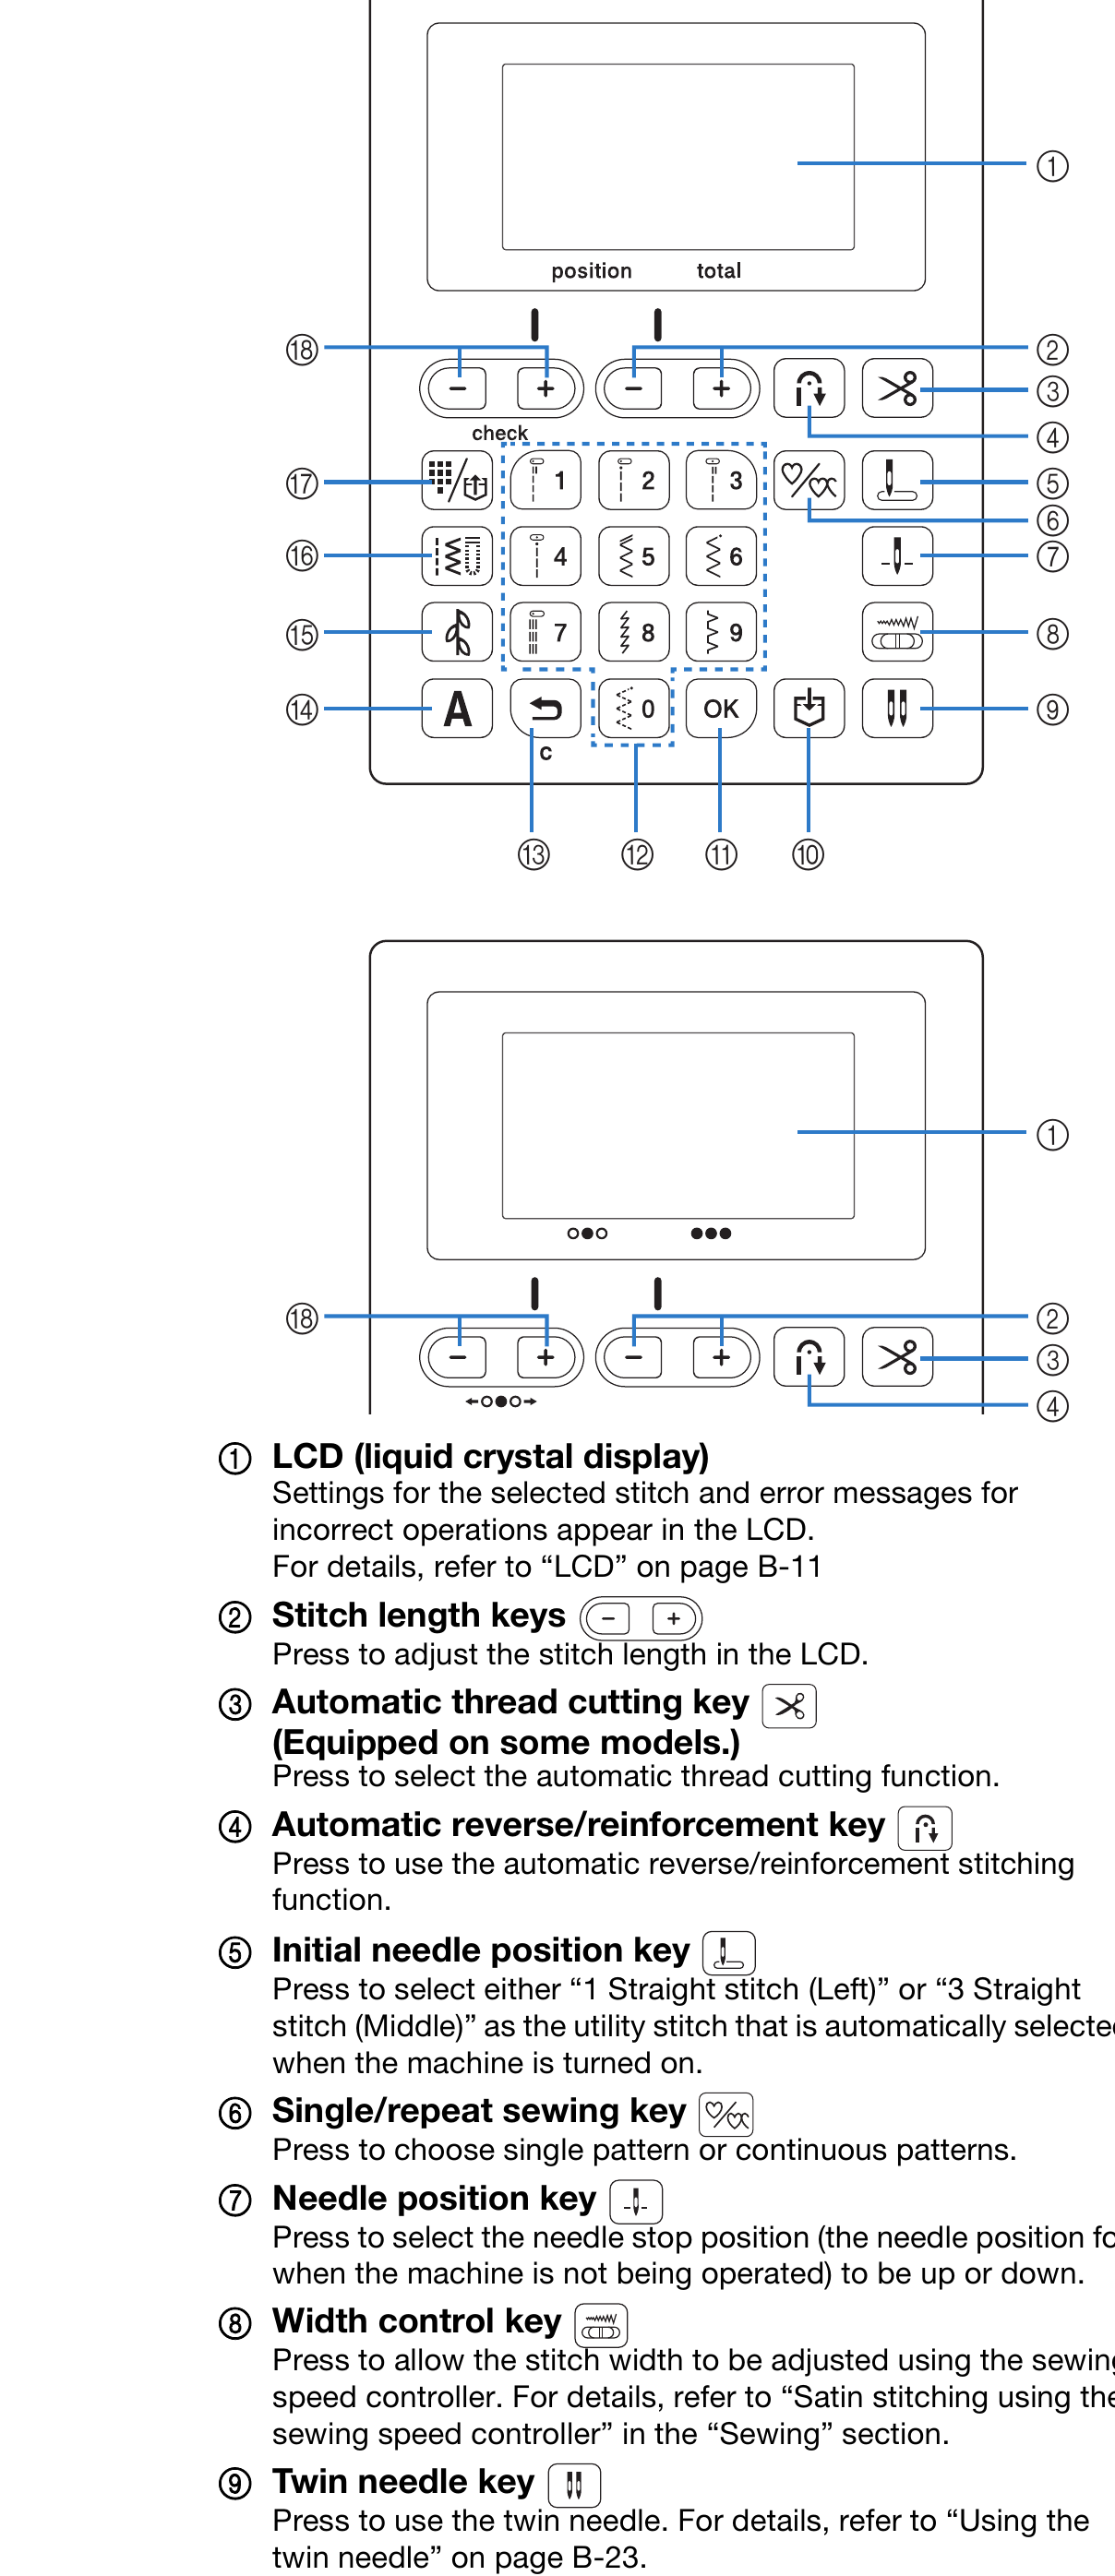
Names of Machine Parts and Their Functions
GETTING
READY
0 Memory key
Operation panel and operation keys
Press to save stitch pattern combinations to machine memory.
For details, refer to “Saving a pattern” in the “Decorative
sewing” section.
B
A OK key
Press to apply the selection, perform the operation or add a
stitch pattern.
B Numeric keys
a Use these keys to quickly select one of the ten most often used
stitches. When selecting other stitches, use these keys to enter
the number of the desired stitch.
C Back key
Press this key to cancel the operation and return to the
r b previous screen.
c
In addition, pressing this key removes the last pattern added
d when combining characters or decorative stitches.
q e D Character stitch key
f
Press to select a character stitch.
p g
E Decorative stitch key
o h Press to select a decorative stitch.
F Utility stitch key
n i
Press to select a utility stitch.
G Preset utility stitch/saved pattern key
Press to select the utility stitch assigned to a numeric key or to
m l k j retrieve a pattern that has been saved.
H Stitch width keys/Pattern check keys
Press to adjust the stitch width or to check stitch pattern
combinations in the LCD.
a Note
• The operation keys of this machine are
capacitive touch sensors. Operate the keys by
directly touching them with your finger.
r b The response of the keys varies according to the
c user.
d The pressure exerted on the keys does not affect
1 LCD (liquid crystal display) the response of the keys.
Settings for the selected stitch and error messages for • Since the operation keys react differently
incorrect operations appear in the LCD. depending on the user, adjust the setting for the
For details, refer to “LCD” on pageB-11
input sensitivity. (pageB-12)
2 Stitch length keys
• When using an electrostatic touch pen, make
Press to adjust the stitch length in the LCD.
sure that its point is 8 mm or more. Do not use a
3 Automatic thread cutting key
touch pen with a thin point or a unique shape.
(Equipped on some models.)
Press to select the automatic thread cutting function.
4 Automatic reverse/reinforcement key
Press to use the automatic reverse/reinforcement stitching
function.
5 Initial needle position key
Press to select either “1 Straight stitch (Left)” or “3 Straight
stitch (Middle)” as the utility stitch that is automatically selected
when the machine is turned on.
6 Single/repeat sewing key
Press to choose single pattern or continuous patterns.
7 Needle position key
Press to select the needle stop position (the needle position for
when the machine is not being operated) to be up or down.
8 Width control key
Press to allow the stitch width to be adjusted using the sewing
speed controller. For details, refer to “Satin stitching using the
sewing speed controller” in the “Sewing” section.
9 Twin needle key
Press to use the twin needle. For details, refer to “Using the
twin needle” on pageB-23.
Basic operations B-5
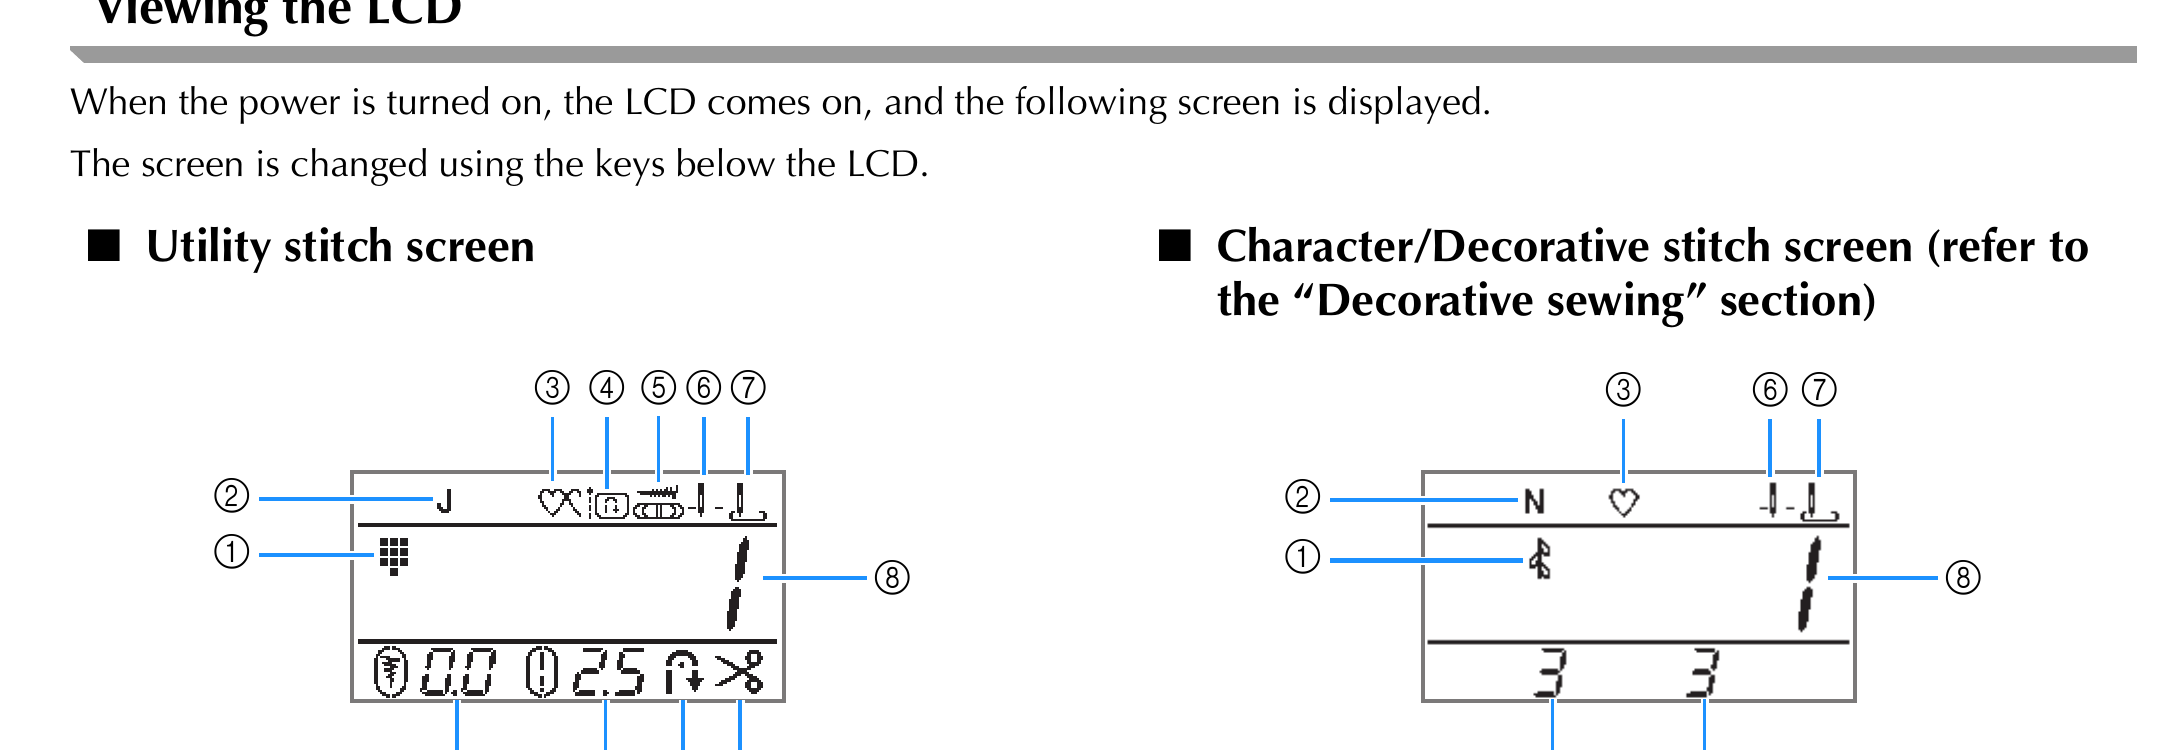
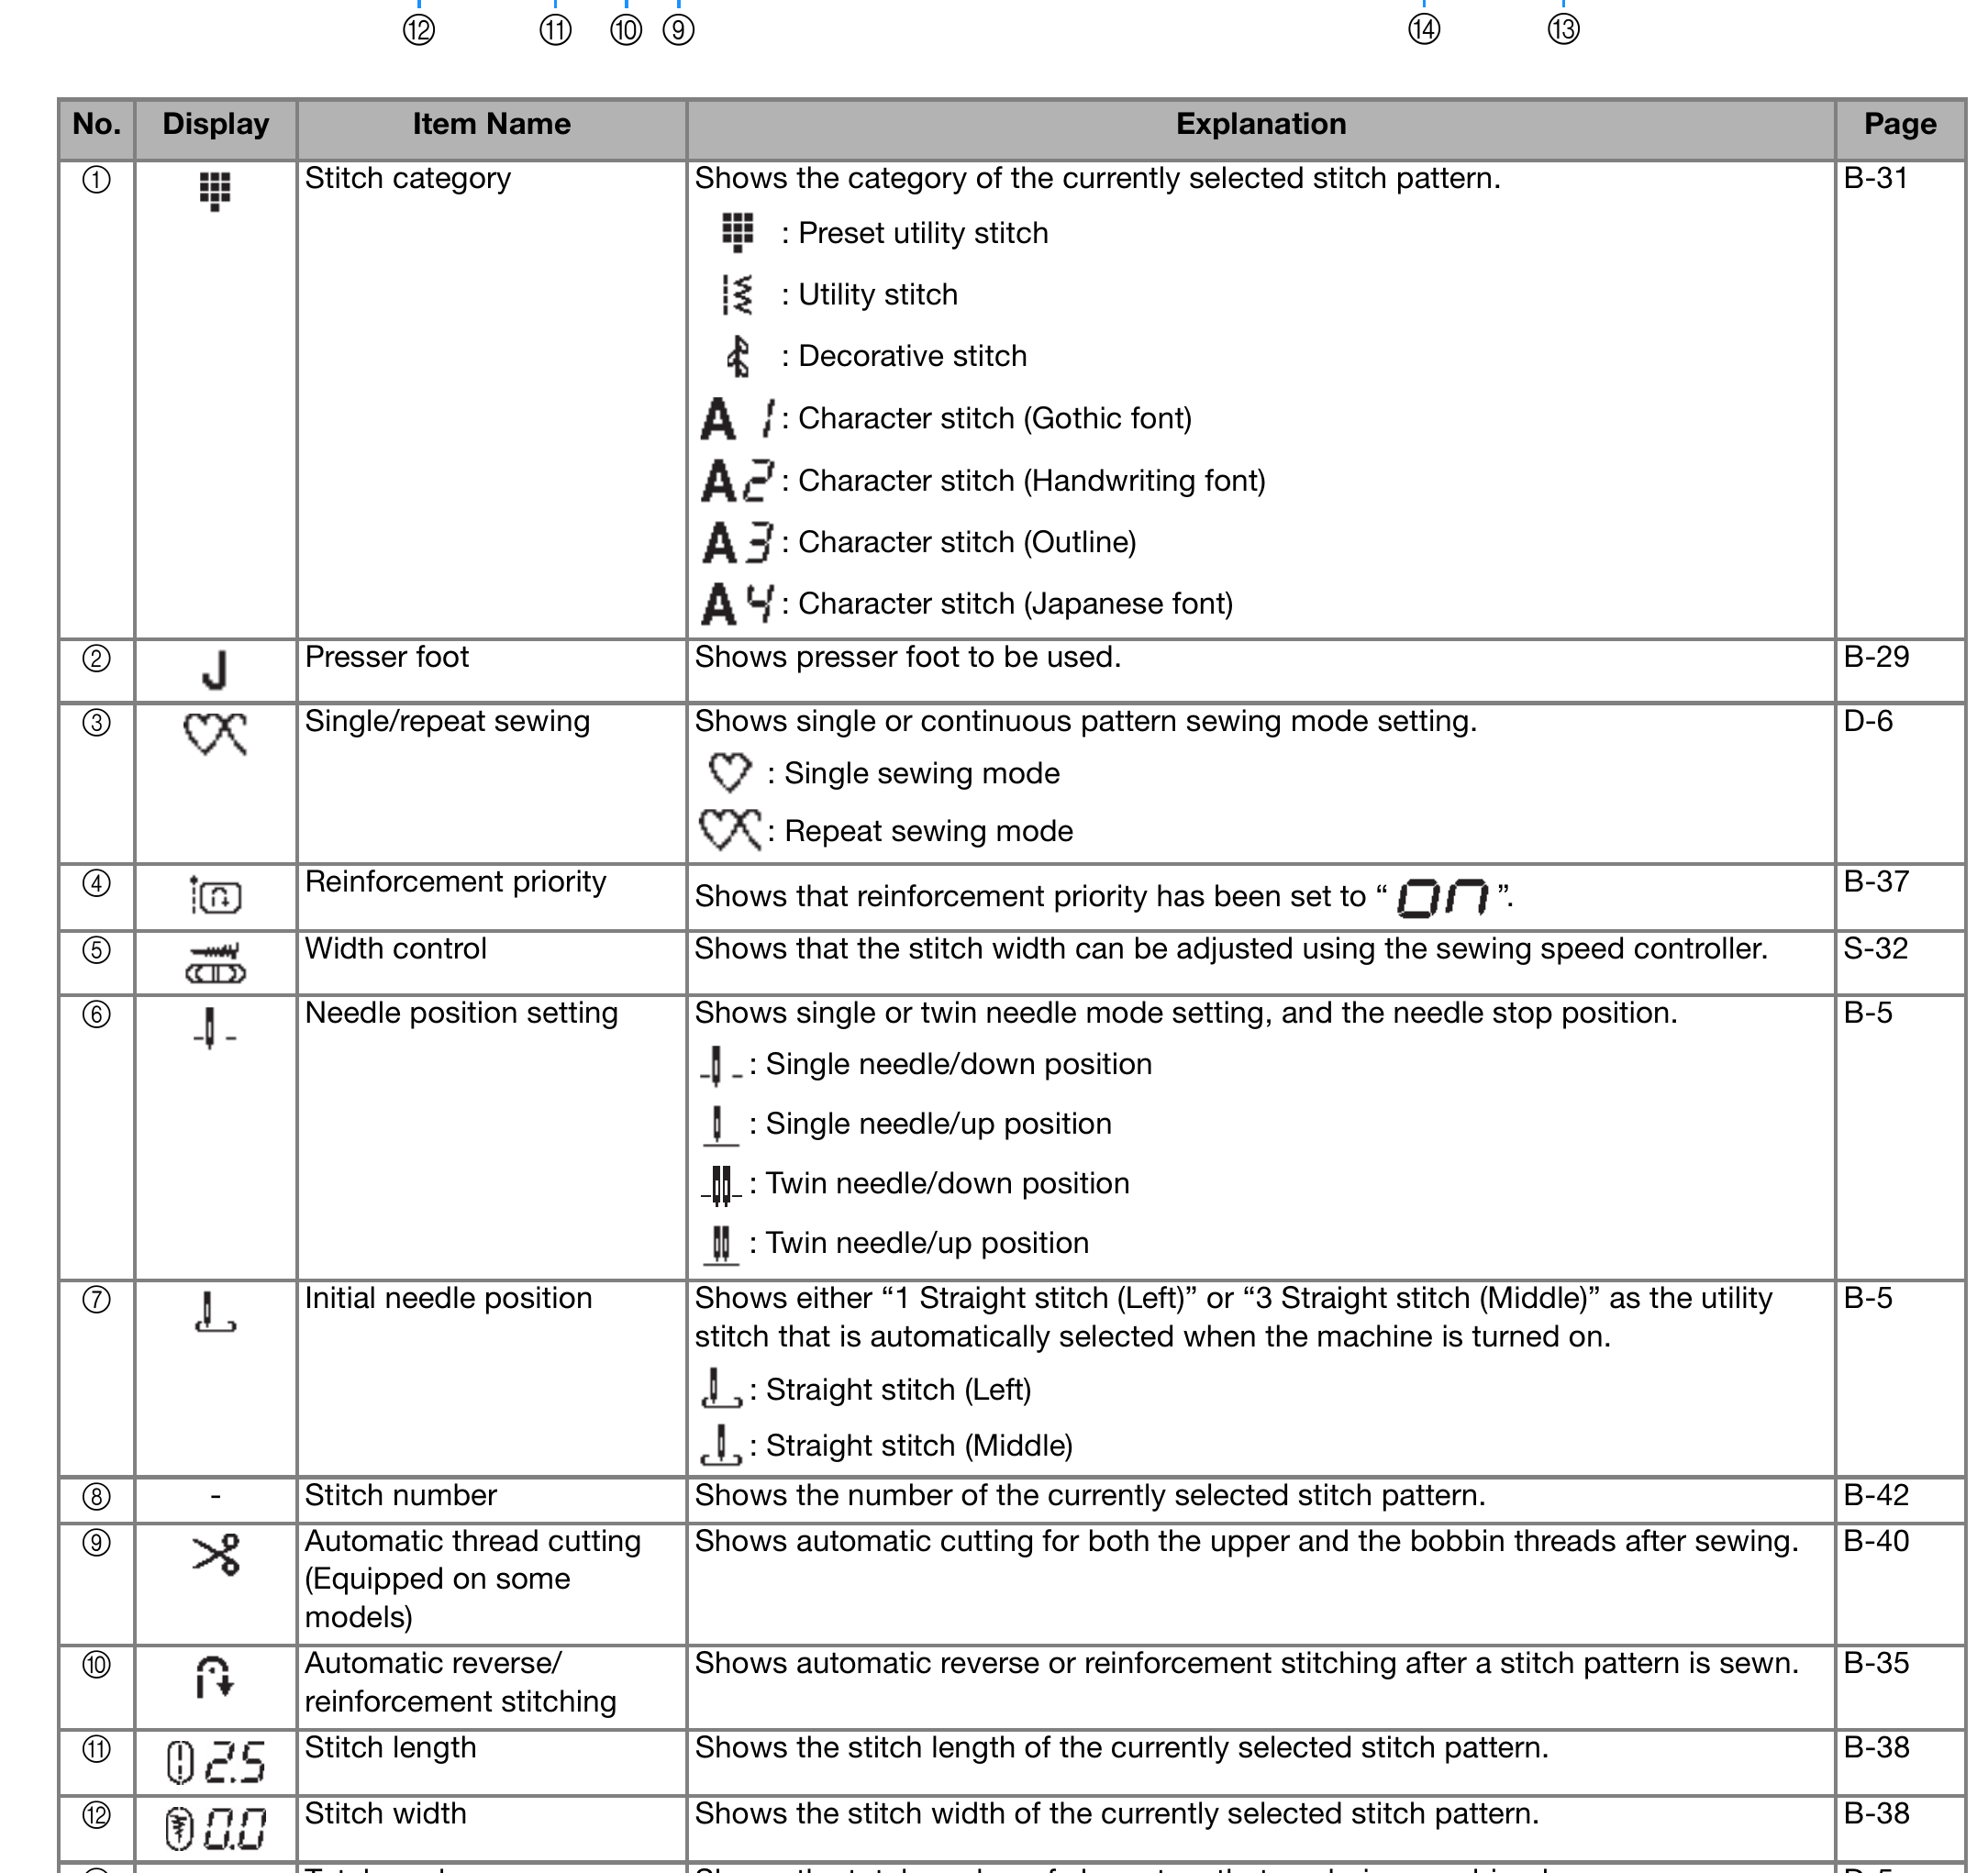
Telas LCD
Página B-11 →